Monday, October 26, 2015

The Stew of Distinction

There's this strange phenomenon that happens every time we visit our parents. No matter how long the visit, we always seem to come home with food. Here are some commonly heard statements as we're packing up the car to go home:

"Do you want anything from the freezer? There's a cooler on the back porch."

"Dad made you this whole tiramisu. I'll wrap it up for you."

"We made [insert dish of choice here] last night and had a ton of leftovers. Now you'll have dinner for the next six days!"

"Want this half gallon of milk? It's about to expire."

"I made salsa from the tomatoes in the garden. Here's a Tupperware full of sloshing red liquid for the car. Oo, watch that lid, now."

"We still have a bunch of cherry tomatoes in the garden, want to take some? Great, here's 500 in a plastic bag."

Don't get me wrong, we are SO grateful to have four parents who are so generous with their surplus food. It made a world of difference when we were first starting out with no money and an over-reliance on Hamburger Helper. Even now--six years, a house, a dog, and many paychecks later--these offerings continue to add some tasty, home-cooked variety to our fridge.

The last time I was in Urbana, my parents made the following decree before I left: "Take some beef from the freezer. We need to make room for another half cow coming from the butcher on Tuesday."

We don't eat much red meat so I didn't know what I was looking for or how much we would need. I looked through the dozens of cuts of meats in the freezer and randomly selected a roast and a package of beef cubed for stew. (My mom called later to tell me I didn't take enough. Go figure.)


I wasn't sure what to do with this new bounty of meat, so I flipped through The Homemaker's Meat Recipe Book to guide me in my beef consumption. On the first page of the cookbook I found this epic recipe, and suddenly I knew exactly what I would make with that cubed beef:


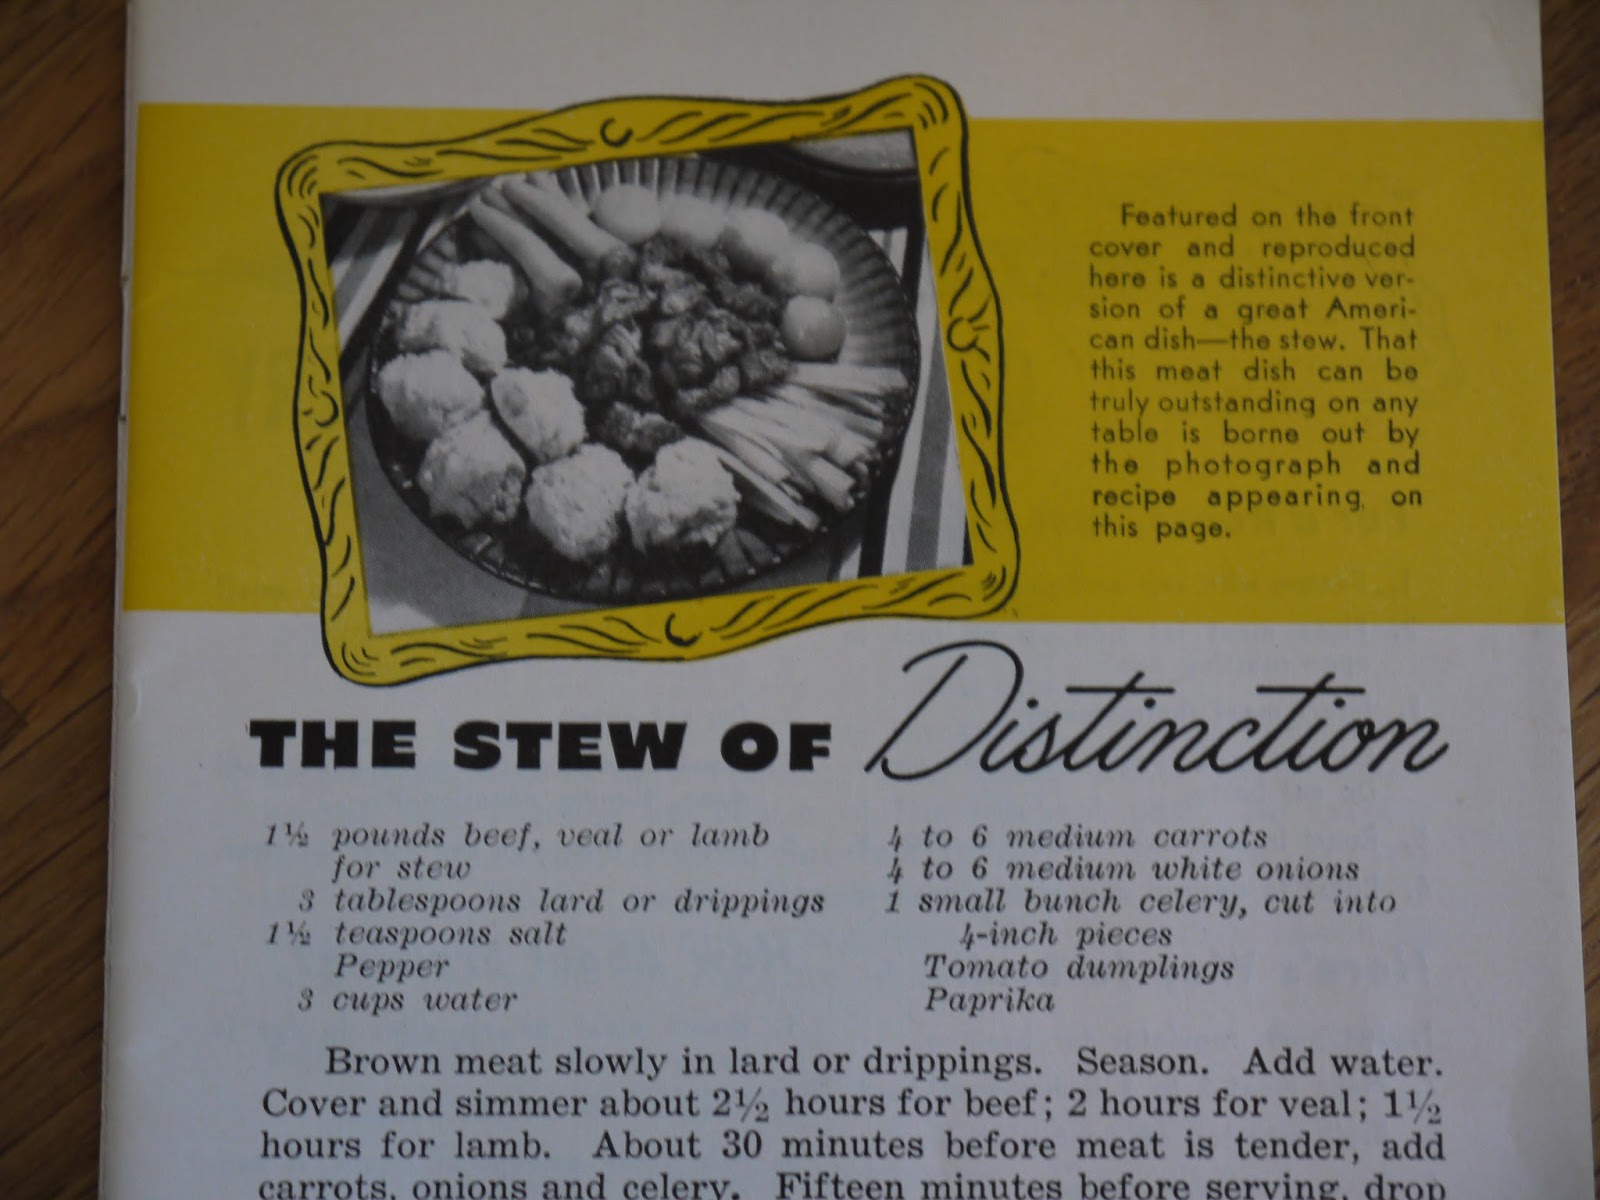
"Featured on the front cover and reproduced here is a distinctive version of a great American dish--the stew. That this meat dish can be truly outstanding on any table is borne out by the photograph and recipe appearing on this page."

The Stew of Distinction
1 1/2 pounds beef, veal, or lamp for stew
3 tablespoons lard or drippings
1 1/2 teaspoons salt
Pepper
3 cups water
4-6 medium carrots
4-6 medium white onions
1 small bunch celery, cut into 4-inch pieces
Tomato dumplings
Paprika

1. Brown meat slowly in lard or drippings. Season. 


Strangely enough, cutting open the package of drippy red meat is the hardest part for me. It's gross and I'm afraid I'm going to under cook everything and make everyone sick. I know this is irrational, but I think this is why I generally tend to avoid cooking meat. With more practice, that fear should subside.

2. Add water. Cover and simmer about 2 1/2 hours for beef; 2 hours for veal; 1 1/2 hours for lamb.

Okay, that's done. Now what am I going to do for another two hours or so before it's time for the next step? Oh I know, I'll work ahead! This recipe calls for onions, carrots, and celery, but doesn't indicate to chop them. From the picture, it looks like everything is supposed to be cooked whole in the pot and then ladled and arranged on a platter. I wanted this to be more of a soup-like stew, so I decided to get a head start on chopping my veggies into bite-sized pieces.


Ten minutes later, I still had quite a bit of time on the clock. And some leftover celery. Knowing I had miles to go before dinner, I decided to make a snack to tide me over.


Yes, those are two varieties of ants on a log: regular ants (raisins) and fire ants (craisins). Sheila supervised the peanut butter application and this snack was *this close* to turning into ants on a dog! Groan, I know. (That pun was courtesy of Taylor, by the way.)

Let's fast-forward about two hours!

3. About 30 minutes before meat is tender, add carrots, onion, and celery. 

4. Fifteen minutes before serving, drop Tomato Dumplings on top of meat and vegetables.
Ah, what's a tomato dumpling you ask? Let's consult the recipe book!


Tomato Dumplings
1 1/2 cups sifted enriched flour
1 teaspoon salt
1 tablespoon baking powder
1 egg beaten
1 tablespoon lard, melted
1/2 cup tomato juice


Sift together flour, salt, and baking powder. Combine egg, melted fat, and tomato juice. Combine mixture with dry ingredients, stirring only until flour disappears.

This results in a sticky, doughy mixture, which I dropped by the spoonful on top of the stew.


5. Cover and cook 12 minutes without removing cover. Remove stew to hot platter, arranging vegetables and dumplings in separate mounds around meat. 


Look how pretty those dumplings are! They rose up but still stayed sticky--for some reason I imagined they would be more like biscuits, but they were definitely dumplings.


6. Sprinkle dumplings with paprika. Thicken liquid with flour for gravy, if desired. 4 to 6 servings.


I didn't serve the stew in mounds on a platter, but I did ladle it out into bowls for dinner.  Like a normal person. And it was really good! The tomato dumplings were...new...but they added a nice texture to help thicken up the stew. And the beef was tender and thoroughly cooked, much to my delight. I'll definitely make this again!

Now, we do have a ton of leftover tomato juice after this recipe. I wonder if our parents might like to take some home with them next time they come to visit...

Tuesday, October 20, 2015

French Toast

As we all know, breakfast foods are superior to all other types of foods. McDonald's only recently caught up to the rest of us when they extended their breakfast menu past 10:30 AM. Not to be outdone, I'm serving breakfast for lunch with this delicious recipe.


French Toast

What you'll need:
4 slices of bread
2 eggs
1/4 cup milk
1/8 teaspoon salt
1 tablespoon sugar
1/2 teaspoon vanilla
1 tablespoon butter


1. Break the eggs into a flat bowl. Add the milk, salt, sugar, and vanilla. Mix well, using a fork.


Here's where things went a little wonky. I didn't have any regular milk, but I did have this delicious vanilla almond milk. So I substituted it for the milk, and cut back on the sugar and vanilla (since the almond milk was already sweetened and vanilla-flavored). At least, that's what I intended to do, but then I splashed more vanilla into the bowl than I meant to, and I misread the recipe and added too much salt. At this point, though, I had my heart set on french toast, so I just pressed onward, self-soothing with the mantra, "But we like vanilla! We're okay!"

Ahem. Moving on.

2. Put a frying-pan on the stove over a small flame. As soon as it's hot, add the butter, spreading it as it melts.


Boom. Nailed it.

3. Lay each slice of bread in the egg mixture and soak it well. 


I tend to feel my best when I limit the amount of gluten and dairy in my diet, so at any given moment I typically have gluten-free bread on hand in my kitchen. I went gluten-free for this step, but you could use any slice of bread that you prefer. I actually think the GF bread is a great option for this recipe because it's already pretty dry and is eager to soak up all of the egg mixture. It's also cut a little thicker than a regular slice of wheat bread, which makes for a little more substantial breakfast-lunch, am-I-right?

4. Then place the soaked slices of bread in the frying-pan and brown first one side and then the other.

Let's see how I stack up to the recipe book. This is, after all, an "Easy Recipe for Beginners" and we're supposed to be having "Fun with Cooking."

10-year-old chef, 1947
28-year-old chef, 2015
Not bad! Even with my modern modifications, this is looking pretty good. I will say my version probably smelled a little more strongly of vanilla. Between the almond milk and my heavy hand with the extract, my kitchen was alarmingly aromatic.

5. Serve immediately with jam or jelly. In the second picture, Gerrie shows you her delicious and wholesome lunch--French toast, jam, a glass of milk and an apple.


I let the toast crisp up a little bit before flipping and serving, and I took some liberty by sprinkling some powdered sugar on top. I did include an apple, though, just like Gerrie.


I could definitely taste the vanilla, but it didn't overpower the toast in the least. Success! I'm glad I didn't give up after step 1--I'm learning that even when things go "wrong," the recipe will probably turn out okay. Probably. After this, my 15th recipe, cooking doesn't seem quite so intimidating.

I'm not sure I would describe this lunch as wholesome, though, but it is pretty delicious. Let's just say McDonald's isn't the only kitchen with a high-caloric breakfast option all day long. Just sayin.

Thursday, October 15, 2015

Peanut Sugar Snaps

It's 3 PM and hunger strikes. Do you know where your snacks are?


Look no further than your peanut snack jar! Remember all of our good times with the National Peanut Council? Well, today we're adding another tasty treat to the canon.

Peanut Sugar Snaps
Here's what you'll need:


1/2 cup shortening
1/4 cup peanut butter
1 cup sugar
2 eggs, well-beaten 
2/3 cup chopped salted or roasted peanuts
1 3/4 cups sifted all-purpose flour
1/2 teaspoon baking powder
1/2 teaspoon salt
1 teaspoon vanilla extract
(little loaf dog optional--do you see her?)

1) Cream shortening and peanut butter. Add sugar gradually. Beat in eggs.


2) Add peanuts and extract.
But first, you'll want to chop your peanuts. I used a food processor for this part, while my stand mixer kept the mixing going. You know, with all the mentions they get, KitchenAid should really be sponsoring this blog. Someone get KitchenAid corporate headquarters on the phone. K thanks.


 3) Sift together flour, baking powder, and salt. Stir into first mixture.

4) Shape in 1-inch balls and place on greased cookie sheet. 


Ooh, look, an action shot! Honestly, I have no idea whether these are 1-inch balls or what. Does anyone ever take linear measurements when they're baking? Maybe I should keep a ruler handy.

5) Press flat with bottom of small water glass covered with a piece of damp cheese cloth.


I didn't have any cheese cloth handy, so I just took my chances with the glass. It turned out okay and the cookies didn't stick to the glass.

6) Bake in a moderately hot oven at 375 degrees F. for 10-12 minutes. Makes about 5 dozen cookies.


Here's a thought--I could probably better approximate the size of the cookies by seeing how many cookies my mixture is yielding. I think I ended up with about 3.5 dozen cookies, so probably could have made each ball a little smaller. Guess we didn't need a ruler to tell us that. Oh snap. (See what I did there?)

In hindsight, I also probably could have smooshed each snap a little more with the glass to get them a little...snappier. They turned out chewier than your typical sugar snap, but still tasted great. No one complained in my house.


So there you have it! A snappy solution to satisfy your 3:00 snack needs!

Monday, October 5, 2015

Banana Nut Tea Bread

I'm not sure there's anything better than a warm slice of banana bread on a chilly fall morning. If you're still looking for the perfect recipe for banana bread, then look no further! I've got you covered.


Banana Nut Tea Bread
1 3/4 cups sifted flour
2 teaspoons baking powder
1/4 teaspoon baking soda
1/2 teaspoon salt
1/3 cup shortening
2/3 cup sugar
2 eggs, well-beaten
1 cup mashed bananas (2-3 bananas)

1) Sift together flour, baking powder, soda, and salt. No, I didn't spill flour on Sheila's head. She just looks like that.


2) Beat shortening until creamy in mixing bowl. Add sugar gradually and continue beating until light and fluffy. Add eggs and beat well.


3) Add flour mixture alternately with bananas, a small amount at a time, beating after each addition until smooth. Add 1/2 cup coarsely chopped nuts to mixture (optional).

I've got to say, recipes like these are made so much better with a stand mixer. Never let 'em see you sweat, that's what I almost never say.

And bananas help, too. In fact, Chiquita Banana says: "Banana helps keep bread fresh and moist!" In other words, the bananas are what makes this bread so a-peel-ing.

Haha! Banana joke for the win!


4) Turn into a well-greased bread pan (8 1/2 x 4 1/2 x 3 inches) and bake in a moderate oven (350 degrees F.) about 1 hour 10 minutes or until bread is done. Makes 1 loaf.


I've made many loaves of banana bread in my short Millennial/Gen Y existence. It's one of my more common culinary attempts, and, even pre-blog, almost all of them have turned out just fine. Mild banana flavor, moderate moisture, you know--typical banana bread. But this recipe really takes the cake....er...bread? (What's the expression here?) It's flavorful and soft and moist, with a perfect golden crust, which is probably due to all of the unhealthy stuff, like shortening and sugar, but I don't care about that. There's fruit in the name, and it comforts me in times of cold weather. Bread will keep us together.