Monday, August 24, 2015

Banana Bran Muffins

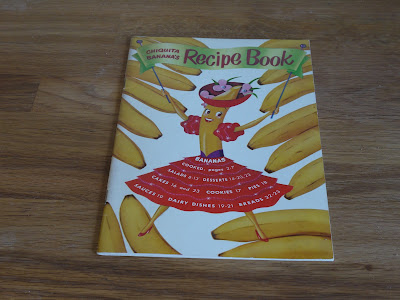
One part of cooking that I'd like to improve is the ability to make creative use of ingredients we already have on hand. Over the past few days, I've had a bunch of bananas ripening on our kitchen counter, and have been thinking about ways to use them.  So while shopping at the Grand Antique Mall last week, I pounced on this recipe book:


The book was printed in 1950 by the Home Economics Department of the United Fruit Company, now known as Chiquita Brands International. It includes dozens of recipes featuring bananas at varying stages of ripeness. Because mine were nearly rotten at this point, I flipped to the "fully ripe" section of the book, and selected this recipe for Banana Bran Muffins.


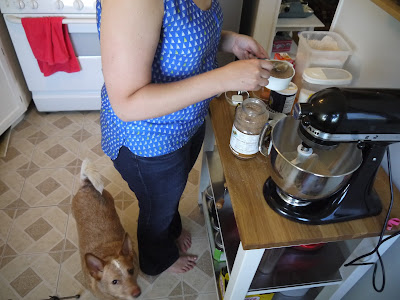
This time I did the cooking while Taylor took the pictures. Hey, I'm growing up!


Banana Bran Muffins
1 cup sifted flour
3/4 teaspoon baking soda
1/2 teaspoon salt
1/4 cup sugar
1 cup bran
1 egg, well-beaten
2 tablespoons sour milk or buttermilk
2 tablespoons melted shortening or salad oil
2 cups thinly sliced, ripe bananas (3-4 bananas)

1) Sift together flour, soda, salt, and sugar into mixing bowl. Add bran and mix well.
(Corgi-shaped helper optional.)


2) Combine egg, milk, shortening, and bananas. Add to dry ingredients, mixing only enough to dampen all flour.
3) Turn into well-greased muffin pans.


4) Bake in a moderate oven (375 degrees Fahrenheit) for 30-35 minutes, or until muffins are done. Makes 8 large or 16 small muffins.


I filled each muffin cup all the way to the top, so the recipe yielded 12 muffins for me. After about 32 minutes, a toothpick inserted in the middle of the muffins came out clean, and the muffins were nicely golden brown.

There are few things better than a warm muffin topped with melting butter. These muffins are solid--they are perfectly moist, and pack just enough banana without being too sweet. They are a tasty, filling choice for breakfast or a snack. I'm sure they'll make another appearance around here soon.


So there you have it! A great use for overly-ripe bananas. And bran. Oh, and aren't these pictures just lovely? I think I'll keep this photographer around.

--------------------------------- 

P.S. Don't forget! Vote for your favorite "popular" peanut butter sandwich recipe by Wednesday, August 26th and I'll make it for Taylor to try!

Saturday, August 22, 2015

It's Peanut Butter Sandwich Time!

I hope you all enjoyed sharing a snack with Professor Peanut and the gang this week. There's plenty more where that came from! Check out this spread from the Snack Jar Plan:


Presenting: the six most popular peanut butter sandwich ideas!


What I love about this page is the implication that there are other peanut butter sandwich ideas, but these are the six MOST popular ones. What a curated collection, National Peanut Council! Who would have thought to add chili sauce, tomato, or watercress to a peanut butter sandwich. Genius.

I can't decide which sandwich to make, so I thought maybe you could help. Let's do a poll. The winner by a popular vote will be fed to Taylor. And he has to eat it. And like it.

In the comments, please write which of these "popular" peanut butter sandwiches should Kaitlyn make for Taylor to eat?

1) Peanut butter and chili sauce
2) Peanut butter and jelly
3) Peanut butter and watercress
4) Peanut butter and bacon
5) Peanut butter and tomato
6) Peanut butter and cream cheese

Cast your ballot! The poll will close Wednesday morning, August 26th, so vote early and vote often!

The votes are in! Click here to see which peanut butter combination won the poll.

Wednesday, August 19, 2015

Peanut Macaroons

With many kids returning to school this week, many of you parents are probably thinking, "What's the plan for after school snacks?" Well, no need to worry. I give you:


The Snack Jar Plan! This booklet was published in 1946 by the National Peanut Council, Inc., and yes, that is a small faction of peanuts pulling a young child through the woods on a cart full of peanut cookies. Snack time--and after-school childcare--solved. You're welcome.


As you'd expect from the National Peanut Council, this booklet is full of propaganda to get people to eat more peanuts.


Each page contains a peanut-based recipe, photo, or factoid. For example, did you know:


The rapidly growing child may need more food than he can get at three meals. It is best to make regular provision for a small extra meal such as an after-school lunch. --U.S. Children's Bureau

That's a fact, people. Professor Peanut affirms your kid needs second lunch.

So why not make some peanut macaroons?


Let's gather the ingredients:
1/4 cup shortening
1/2 cup sugar
1 egg, well beaten
1 cup finely chopped salted or roasted peanuts (I used my food processor here) 
1/2 teaspoon almond extract
3 cups of ready-to-serve flake cereal (You mean corn flakes? Okay, got it.)


1) Cream shortening. Add sugar gradually.
2) Beat in egg, and add peanuts, almond extract, and cereal. Mix thoroughly.
3) Press mixture into rounded bowl of tablespoon. Drop on greased baking sheet 2 inches apart.


I learned the importance of really packing the mixture into the spoon, because these cookies have a tendency to crumble apart before they're baked. I used an ice cream scoop for this step, and a friend decided to drop by to help. That's Sheila! She's our part-Corgi, part-Australian Cattle Dog. I'm surprised she hasn't made an appearance on this blog before now because I'm super obsessed with her.

4) Bake in moderate oven of 375 degrees Fahrenheit for 12-15 minutes, or until well browned. Makes about 3 dozen.


Because I used an ice cream scoop and not a tablespoon as suggested, this recipe yielded only 2 1/2 dozen macaroons for me. And they are delicious! The chopped peanuts and corn flakes give the macaroons a great crunch, and the flavor is just right--much lighter than a regular peanut butter cookie.

By the way, are you wondering what is the difference between a macaron and a macaroon? Read this.


So there you have it! A pretty delicious after-school/after-work/after-breakfast/after-midnight snack for you, courtesy of your friends at the National Peanut Council. Bon appetit!

Monday, August 17, 2015

Olive and Nut Sandwich Spread

Thank goodness for sandwiches. Without them, I'd probably have had to learn to cook a lot sooner. But because of sandwiches in their supreme simplicity, I've been able to keep my belly filled with minimum effort or thought. My go-to sandwich filler consists of a few slices of deli turkey, a slice or two of cheddar cheese, a dab of mayonnaise, and a bit of mustard. Or peanut butter and jelly. When in doubt, always go with peanut butter. Put simply, I love sandwiches, so imagine my delight when I came across this page in Wartime Suggestions:


Why, yes, I could use some variety in my sandwich spreads! Now, which to try first. My temptation was to go with the familiar--the peanut butter option--and call it a day. But the whole point of this blog is to learn new cooking skills, and that wouldn't be very educational, would it?

So I went with one of the more...unorthodox...combinations. Introducing: Olive and Nut Spread. 

These are the instructions as listed in the booklet: Chop stuffed olives and nuts fine; moisten with cream cheese and mayonnaise.

Hm. Okay. How many olives? What kind of nuts? How much cream cheese? How do you make this?! Remember my discomfort with the "improvising" part of cooking? Yeah, clearly I'm not quite ready for this kind of test. So I took a deep breath, Googled it, and found this recipe with a few more specifics. Whew.

I gathered the ingredients below and got started:


6 oz. cream cheese
1/2 cup mayonnaise
1/2 cup chopped pecans
1 cup sliced olives
2 tablespoons of olive juice from the jar
Dash of pepper

Mix all ingredients together. Serve on sandwiches or with crackers.

Simple enough! First, I used my food processor to chop the pecans and stuffed olives.


Gulp. It admittedly looked a little questionable at this point, but I pressed onward. Next I mixed in the mayonnaise, cream cheese, olive juice, and pepper. Once finished, I took a small taste, and you know, it wasn't too bad. I could definitely taste the saltiness of the olives and the crunchiness of the nuts. The ratio of cream cheese and mayonnaise to olives and nuts is a little high, making this recipe resemble more of a dip than a sandwich spread. I couldn't imagine slathering it between two pieces of bread, so I scooped a dollop onto a plate with some Triscuits and attempted to feed it to Taylor as an afternoon snack. 


Not wanting to crush my fledgling chef spirit, Taylor took a bite and said, "Mmmm, let's have more later!" It's since been a few days, and I don't think he has eaten any more of it. 

I even attempted to share my creation with our friends Alex and Kyle this past weekend, and let's just say there was a lot leftover when it was time to go home. I think this is the kind of recipe where you either really love it or you just politely endure it for the sake of your friend's feelings/blog. Even Wartime Suggestions alludes to this phenomenon--take a closer look at the recipe listing:


It's expensive, but you may want to try it once in a while. Will keep nicely for several days.

In other words, "This is a strange combination, we know, but heck, why not mix it up a little? It'll take multiple sittings to get through the batch, but that's what your Frigidaire refrigerator is for. So splurge on those olives, you crazy kids!"

Overall, this recipe isn't a homerun at my house, and I likely won't make it again. But let's just say I am invited to an olive-admirers' convention and they specifically request the Olive and Nut Sandwich Spread. In that unlikely hypothetical scenario, I would reduce the mayonnaise in this recipe and let the cream cheese do the heavy lifting. It might launch this dish into cheese ball territory, but it would certainly help cut some of the tangy aftertaste. Wow, look at me! Maybe I'm learning a little something about cooking after all.

Saturday, August 15, 2015

Frozen Vanilla Cream

With so many Wartime Suggestions to choose from, it was difficult to decide on the first recipe to try on the blog. Actually, that's not true--as soon as I flipped to this section of the book, it was pretty clear we'd be having dessert first.


Eager for the sweet reward of homemade ice cream, my husband, Taylor, jumped in to help. So, full disclosure, he mixed the ingredients, and I photographed. Baby steps.

Okay, here we go! First we gathered the following ingredients:


1 can (1 1/2 cups) sweetened condensed milk
3 cups milk or coffee cream
2 tsps. vanilla
2 tsps. lemon juice (not pictured here, oops)

1) First heat one cup of milk, then add the can of sweetened condensed milk and blend. 

We chose to make use of our KitchenAid stand mixer for this recipe, which, I might add, is likely what the original readers of Wartime Suggestions would have used for mixing, as well. Bonus points for keepin' it old school.


2) Add the remaining two cups of milk and lemon juice and blend. Then pour the mixture into the freezing tray and set the freezer's temperature control at the coldest position.

We don't have a "freezing tray" and our freezer is pretty much always in the coldest position. So we took some liberties with this step and poured the cream into a Pyrex container. Oh hey, there's the lemon juice! We got this.


3) When frozen, remove mixture to mixing bowl; add vanilla and whip with electric or hand beater until mix becomes light and creamy.  


After a few hours, we pulled the cream from the freezer and poured it back into the mixing bowl. It wasn't quite frozen, but it looked a little like icy sludge in spots and it was getting late, so we decided it was as good as it was going to get. We swapped our beater attachment for our whisk attachment, added the vanilla, and within a few minutes our mixture was light and creamy. By whipping so much air into the mixture, it also multiplied! We ended up needing an additional container for the freezer. 

4) Return quickly to freezing tray and allow to finish freezing. When dessert is completely frozen, remember to turn temperature control half way back to normal position for holding until serving time.


We didn't mess with the temperature controls, so once the cream reached the freezer shelf, our job was done. See that raspberry popsicle? I'm not ashamed to admit that I ate it as soon as our vanilla cream was nestled in its icebox bed. 

Okay, here comes the good part. After freezing overnight, we taste-tested a few scoops of our concoction. The texture was like...snow. Like soft, fluffy, first snowfall of the season snow. It was solid enough to scoop into a ball, but it would probably fall apart if you threw it. Not that you'd want to throw this stuff. This recipe has much less fat than typical ice cream, and contains no real cream, per se. (Which is great for me, as lactose isn't exactly my best friend in the world.) It is supremely sweet and light and instantly melts in your mouth, like super sweet vanilla milk ice. The deeper we scooped into the container, the icier and more compacted the mixture became, but the flavor was still just as strong. 


So would we make this again? Yes! With a few alterations. We might dial back on flavor by cutting a bit of the vanilla, and we might freeze the mixture in our pre-chilled KitchenAid ice cream bowl attachment to ensure more consistent texture. 

Now that we know the deal, we'll likely try other more intriguing flavor variations, like Marble Cream or Pineapple Milk Sherbet, to name a few. The sky's the limit, especially if you eat ice cream for dinner. Which I find to be quite necessary during the month of August, thank you very much.
Friday, August 14, 2015

To the Home Economists and Engineers

Hey there! You're here! And by here, I mean the post-war Cape Cod kitchen of a 20-something woman who still doesn't know her way around a frying pan. Naturally.

Sure, I can handle the basics--fried eggs, grilled cheese, pancakes--but cooking a complete, age-appropriate meal with real ingredients? Yeah, that's another story. It isn't that I can't read recipes. The 'reading' isn't the problem; it's the 'adhering to' and occasional 'improvising with' that's so intimidating. Good recipes always seem to have complex steps, tiny pictures, and lots of obscure ingredients. Would you agree? To put it simply, cooking has always been overwhelming, and I've never really bothered to learn.

Until now! I've decided that enough is enough--it's time to roll up my sleeves, don my apron, and get my hands dirty. But where to begin?

Fortunately, I didn't have to look far for inspiration:


I found this gem at the Tri-State Antique Market in Lawrenceburg a few weekends ago. Published by Frigidaire in the 1940s, this booklet was designed with dozens of practical tips to maximize meager food rations and make efficient use of limited refrigerator space during wartime.

Take a look at the Foreword:


Shopping is done less frequently. Food for the weekend is purchased as early as Wednesday. People are buying 'variety meats' they never used before. Preparing foods they used to buy in cans. Making greater use of leftovers.

I don't know about you, but fast forward 70 years or so, and that still pretty much describes our household:
Grocery shopping less often? Check.
Storing food longer? Check.
Trying new ingredients? Check.
Preparing more fresh food? Check.
Using leftovers to help stretch our food budget? Check.

In addition to featuring some brilliant bits of nation-unifying rhetoric, this booklet showcases real advice from 'home economists, engineers, and service experts' to help folks do more with less. And you know what? I find that kind of ingenuity in the kitchen inspiring. For the first time, I'm EAGER to cook something! And for that, I dedicate this blog to those mid-century heroes who literally wrote the book(s) on simple, creative cooking. Thanks for the spark.

I also dedicate this blog to the mid-century aficionados out there. I share your admiration of solid wood furniture, your appreciation of original advertisements. What can I say? We're old souls.

And I dedicate this blog to you, dear friend. Thanks for stopping by. I hope you'll join me as I uncover some hidden treasures right here in my kitchen.

Engineering meets Home Ec? Heck yeah, this is gonna be good.