Showing posts with label Dinner. Show all posts

Monday, December 14, 2015

Pot Roast of Beef

A few weeks ago, Taylor and I were passing through Urbana, and we were "strongly encouraged" to take some beef from the freezer. Again. Unlike last time, though, we took full advantage of this offer and packed about 5 different cuts of meat into our cooler. Hey, I've got bellies to fill and blog posts to write! Free food for the win!

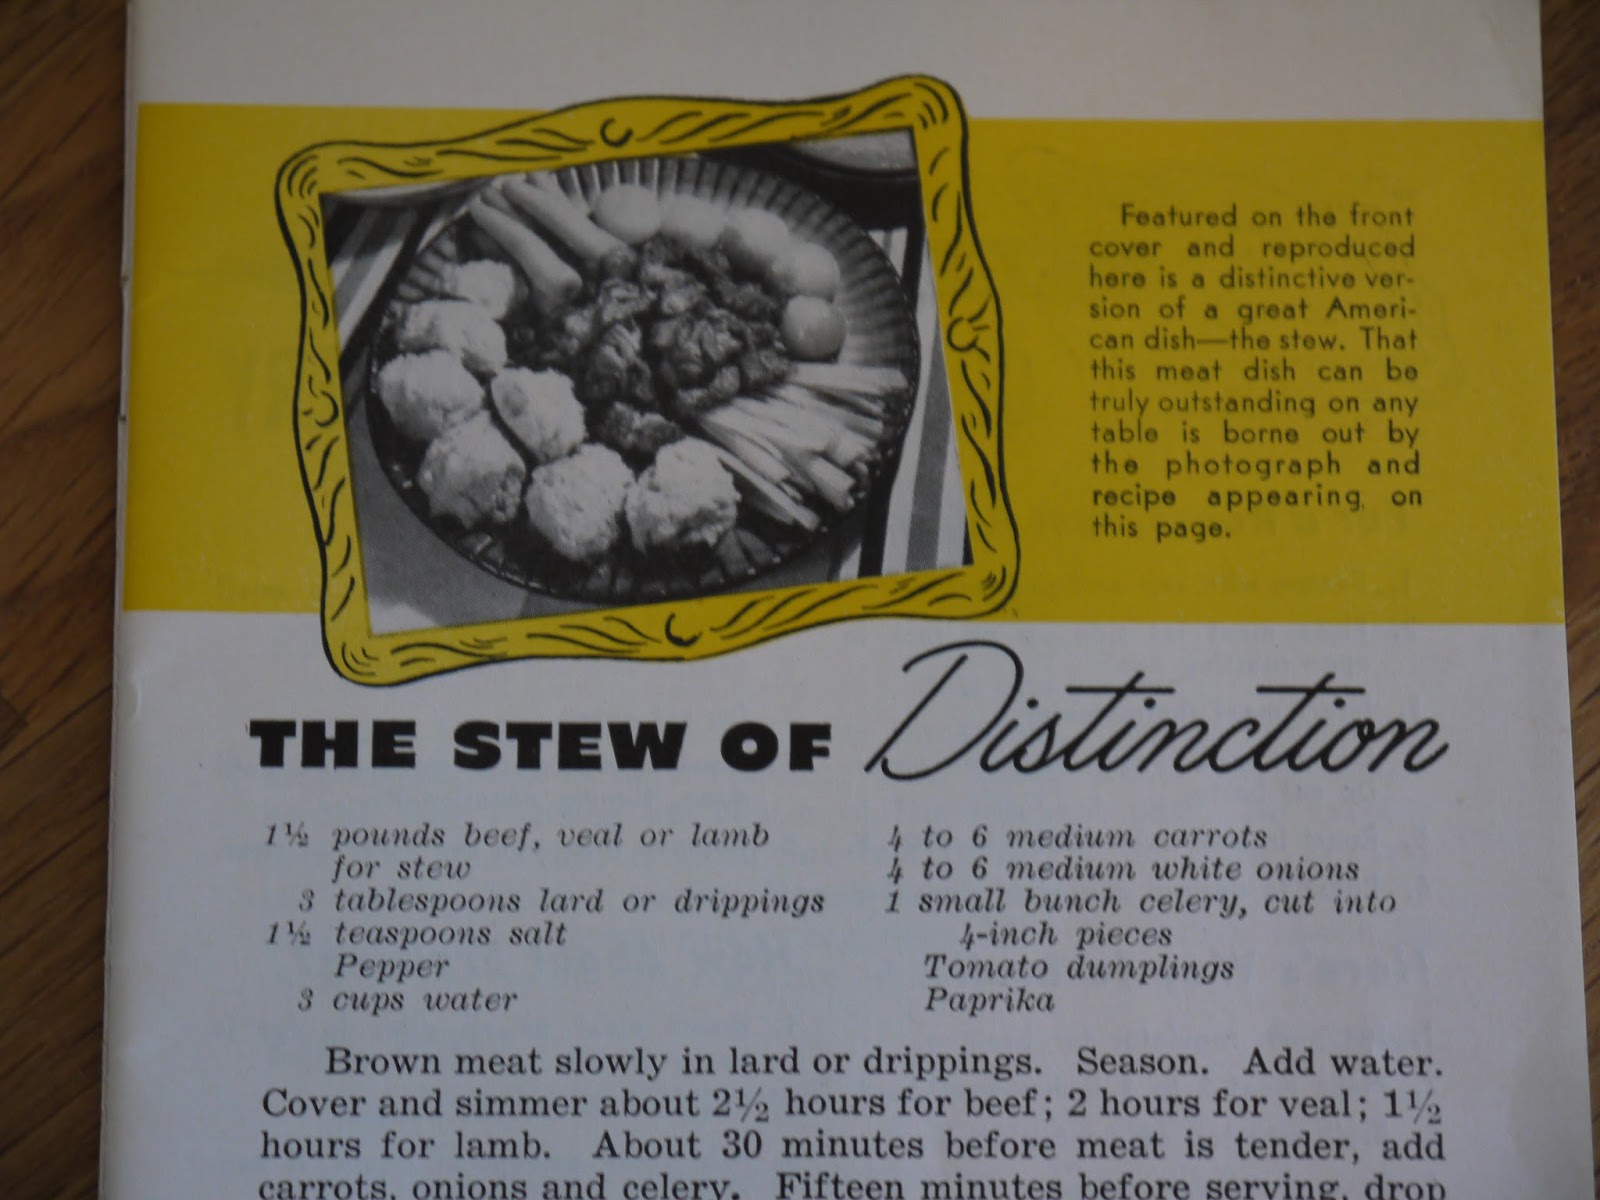
Once home, I flipped through some cookbooks to see what I could make with this bounty of beef. My Family Fare: Food Management and Recipes cookbook had several promising candidates.


Printed by the Kroger Company in 1950, this is one of the more "normal" cookbooks in my collection. It isn't based around a particular food or brand, it gives practical food handling tips, and it has a good variety of recipes, like this simple recipe for "pot roast of beef." Having never made pot roast before (I know, I know, I'm a pitiful adult), I thought I'd give it a try.


Pot Roast of Beef

1) Select 4 to 5 pounds of beef--chuck, rump, or round.


You know, I don't care how many times I've cooked with meat, I'm still grossed out by the juices in the package. I know it's not blood--it's myoglobin and water--but still. Yuck.

2) Rub the meat with salt, pepper, and flour, and brown on all sides in a little hot fat in a deep heavy pan with a cover.


With no instructions for how much salt, pepper, and flour to use, this is the part of the story where I threw caution (and flour, apparently) to the wind. Normally, I'm conservative in my mess-making, and at the very least, try to clean up as I go along. This time I let the flour fly. And I didn't clean it up for at least 20 minutes. Live dangerously, that's what I never say!

3) Slip a low rack under meat to keep it from sticking to pan. Add one-half cup of water; cover pan closely.


I didn't have a rack, but I fully believed I could keep the meat from burning by sheer will power. And water.

4) Cook slowly over low heat until done--about 3 hours. Add more water as needed.

While the roast cooked, I chopped some potatoes, onions, carrots, and sweet potatoes so that I'd be ready for the next step.


Here I'd like to add my apologies for the quality of the photos from here on out. When I started the roast, it was daytime and I had good light for photos. And like an hour later it was dark because it's winter now and everything is sad and hopeless starting at 5:30 PM. So, yeah, we're going to have some weird shadows and glare from the flash, okay? Somebody pass the Zoloft.

5) During the last half hour, cook vegetables with meat--quartered potatoes, onions, and whole carrots. 

Finally my roast was complete, and I was ready to cut the meat and serve with the roasted vegetables.


I'm not a meat connoisseur by any means, but my dinner guests affirmed that the roast was tender, juicy, and well-cooked. We did notice that not all of the vegetables softened quite like we would have liked; there were a few particularly crunchy sweet potato chunks on my plate. I probably should have added more water to fully submerge the vegetables--steam was not enough!--and I think maybe I could have added the vegetables to the pot a little earlier, too.


Otherwise, here it is! A pot roast of beef recipe, still going strong 65 years later. Don't mess with the classics, right?


And before I conclude this post, I just want to draw your attention to this drab photo:


This photo is significant because it is the last one depicting our old kitchen floor in a post. That's right--just a few days later, that old vinyl floor would be replaced by this nice new ceramic one:

From this post forward, those gorgeous gray-brown tiles will serve as the backdrop of the blog. We've still got a few things to finish--like the baseboards, and the backsplash--before we can call this renovation complete, but in the meantime, maybe I'll cook up a post with the before-and-after process. Or maybe I'll cook up some jello. We haven't had any jello recipes yet...

Tuesday, November 24, 2015

Whipped Sweet Potatoes in Orange Shells

With Thanksgiving just around the corner, this week I'm sharing a series of vintage recipes that are sure to turn heads at your holiday table. Bon appetit!

Before there was Pinterest, there were vintage cookbooks. Remember that article I shared earlier this month from the NY Times Magazine? Presentation is everything.

So today we're going to take a simple, traditional recipe and jazz it up just in time for Thanksgiving!


Whipped Sweet Potatoes in Orange Shells
(serves 8)
8 Sunkist oranges
4 cups boiled or baked sweet potatoes
2 teaspoons salt
2 tablespoons melted butter
8 marshmallows


1) Cut off tops of oranges and remove pulp and juice with a sharp knife and spoon.


Don't let the length of this sentence fool you. This step is the most time-consuming part of the whole recipe, but it's worth it! I used a small, sharp knife and an ice cream scoop to hollow out each orange shell. This part took about 40 minutes, but I also stopped a few times to take photos and check Instagram, so who knows how long it actually takes.


At this point, you may be wondering why we're spending so much time on preparing oranges when this is supposed to be a sweet potato recipe. Well, this recipe comes from the California Fruit Growers Exchange in 1940, so yeah, oranges are going to take a starring role on this one.


2) Whip sweet potatoes with salt, butter, and orange juice to moisten to desired consistency. Use juice secured in preparing shells.

Because I used the bulk of my time hollowing out orange shells, I decided to get a few minutes back by going with canned yams for this step.


Best decision ever! In no time, my sweet potatoes were soft and mashable. I stirred in the melted butter, orange juice, and salt, and added a few pinches of brown sugar for good measure.


(P.S.--All of that leftover orange pulp didn't go to waste. Come back tomorrow to see how you can put the remaining orange pieces to use!)

3) Fill orange shells and top each with a marshmallow. Brown in moderate oven until heated through.

Because I was taking this dish to share at Friends-giving, I decided to hold off on the last step until I arrived at the party. Speaking of, take a look at this tablescape! Sunkist isn't the only one who knows the art of presentation. My friend Amanda knows how to set a table!


Before we ate, I scooped the sweet potatoes into the orange shells and placed a marshmallow on each. After a few minutes in the oven, the marshmallows melted on top of the warm, fluffy sweet potatoes and were ready to be served. 


I must say an orange shell is a clever way to serve just about anything. It's a tidy single-serving container to keep the sweet potatoes from encroaching on a crowded plate of goodies. And they're just so darn cute!

Monday, October 26, 2015

The Stew of Distinction

There's this strange phenomenon that happens every time we visit our parents. No matter how long the visit, we always seem to come home with food. Here are some commonly heard statements as we're packing up the car to go home:

"Do you want anything from the freezer? There's a cooler on the back porch."

"Dad made you this whole tiramisu. I'll wrap it up for you."

"We made [insert dish of choice here] last night and had a ton of leftovers. Now you'll have dinner for the next six days!"

"Want this half gallon of milk? It's about to expire."

"I made salsa from the tomatoes in the garden. Here's a Tupperware full of sloshing red liquid for the car. Oo, watch that lid, now."

"We still have a bunch of cherry tomatoes in the garden, want to take some? Great, here's 500 in a plastic bag."

Don't get me wrong, we are SO grateful to have four parents who are so generous with their surplus food. It made a world of difference when we were first starting out with no money and an over-reliance on Hamburger Helper. Even now--six years, a house, a dog, and many paychecks later--these offerings continue to add some tasty, home-cooked variety to our fridge.

The last time I was in Urbana, my parents made the following decree before I left: "Take some beef from the freezer. We need to make room for another half cow coming from the butcher on Tuesday."

We don't eat much red meat so I didn't know what I was looking for or how much we would need. I looked through the dozens of cuts of meats in the freezer and randomly selected a roast and a package of beef cubed for stew. (My mom called later to tell me I didn't take enough. Go figure.)


I wasn't sure what to do with this new bounty of meat, so I flipped through The Homemaker's Meat Recipe Book to guide me in my beef consumption. On the first page of the cookbook I found this epic recipe, and suddenly I knew exactly what I would make with that cubed beef:


"Featured on the front cover and reproduced here is a distinctive version of a great American dish--the stew. That this meat dish can be truly outstanding on any table is borne out by the photograph and recipe appearing on this page."

The Stew of Distinction
1 1/2 pounds beef, veal, or lamp for stew
3 tablespoons lard or drippings
1 1/2 teaspoons salt
Pepper
3 cups water
4-6 medium carrots
4-6 medium white onions
1 small bunch celery, cut into 4-inch pieces
Tomato dumplings
Paprika

1. Brown meat slowly in lard or drippings. Season. 


Strangely enough, cutting open the package of drippy red meat is the hardest part for me. It's gross and I'm afraid I'm going to under cook everything and make everyone sick. I know this is irrational, but I think this is why I generally tend to avoid cooking meat. With more practice, that fear should subside.

2. Add water. Cover and simmer about 2 1/2 hours for beef; 2 hours for veal; 1 1/2 hours for lamb.

Okay, that's done. Now what am I going to do for another two hours or so before it's time for the next step? Oh I know, I'll work ahead! This recipe calls for onions, carrots, and celery, but doesn't indicate to chop them. From the picture, it looks like everything is supposed to be cooked whole in the pot and then ladled and arranged on a platter. I wanted this to be more of a soup-like stew, so I decided to get a head start on chopping my veggies into bite-sized pieces.


Ten minutes later, I still had quite a bit of time on the clock. And some leftover celery. Knowing I had miles to go before dinner, I decided to make a snack to tide me over.


Yes, those are two varieties of ants on a log: regular ants (raisins) and fire ants (craisins). Sheila supervised the peanut butter application and this snack was *this close* to turning into ants on a dog! Groan, I know. (That pun was courtesy of Taylor, by the way.)

Let's fast-forward about two hours!

3. About 30 minutes before meat is tender, add carrots, onion, and celery. 

4. Fifteen minutes before serving, drop Tomato Dumplings on top of meat and vegetables.
Ah, what's a tomato dumpling you ask? Let's consult the recipe book!


Tomato Dumplings
1 1/2 cups sifted enriched flour
1 teaspoon salt
1 tablespoon baking powder
1 egg beaten
1 tablespoon lard, melted
1/2 cup tomato juice


Sift together flour, salt, and baking powder. Combine egg, melted fat, and tomato juice. Combine mixture with dry ingredients, stirring only until flour disappears.

This results in a sticky, doughy mixture, which I dropped by the spoonful on top of the stew.


5. Cover and cook 12 minutes without removing cover. Remove stew to hot platter, arranging vegetables and dumplings in separate mounds around meat. 


Look how pretty those dumplings are! They rose up but still stayed sticky--for some reason I imagined they would be more like biscuits, but they were definitely dumplings.


6. Sprinkle dumplings with paprika. Thicken liquid with flour for gravy, if desired. 4 to 6 servings.


I didn't serve the stew in mounds on a platter, but I did ladle it out into bowls for dinner.  Like a normal person. And it was really good! The tomato dumplings were...new...but they added a nice texture to help thicken up the stew. And the beef was tender and thoroughly cooked, much to my delight. I'll definitely make this again!

Now, we do have a ton of leftover tomato juice after this recipe. I wonder if our parents might like to take some home with them next time they come to visit...

Tuesday, September 22, 2015

Apple-Pork Steaks

Let's think of all the things we like to eat with apples. Oatmeal? (Check out my last post!) Sausage and eggs? (You betcha!) Pork steak? (Uhh...maybe?)


With the help of the Homemaker's Meat Recipe Book (1948-49), we can find out! You grab the apples, and I'll get the pork steaks.

Okay, what's a pork steak? I didn't know the difference between a pork steak and a pork chop, so I consulted the leading experts--the National Pork Board's website and Taylor's brain--to learn more. Here's what I learned:

"Blade steaks (also called pork steaks) are cut from the pork shoulder and contain the blade bone. Blade steaks are flavorful like roasts because they are rich in marbling, which keeps them tender during cooking. Blade steak is a popular, quick-cooking cut for grilling.

"Pork chops are the most popular cut from the pork loin, which is the strip of meat that runs from the pig’s hip to shoulder. Depending on where they originate, pork chops can be found under a variety of names, including loin, rib, sirloin, top loin and blade chops."

Taylor corroborated this account. He added that pork arm or blade steaks would have been more commonly available to WWII and post-war consumers, as higher-quality cuts of meat, like pork chops, would have been rationed to the troops.

Got it, let's make some meat!


Apple-Pork Steaks
4 pork arm or blade steaks
2 tablespoons lard or drippings
2 stalks celery
2 tart apples, unpeeled
1 tablespoon vinegar
1 teaspoon sugar
1 1/2 teaspoons salt
1/2 cup water
2 tablespoons enriched flour
2 tablespoons water

1) Brown pork steaks in lard or drippings.
After all that explanation, I decided to just buy pork chops because they didn't seem all that different and that's what I could quickly find in the meat section of the grocery store in 2015. Maybe next time I'll visit a butcher in 1948.

I also didn't have lard or drippings on hand, so I just used a little olive oil to brown my pork chops over medium-high heat. It worked just fine.

This is a big deal for me--adapting the recipe, making it work. Pre-blog, I would have given up on this recipe after reading the unfamiliar title. And yet, here we are, chipping away at the meat ceiling, one recipe at a time.


2) Cut celery in 2-inch lengths and apples in eighths.
While the pork chops browned in the pan, I cut my celery and granny smith apples. This step is best summarized by the words 'crunchy' and 'green.'


3) Place over pork steaks and add vinegar, sugar, salt, and 1/2 cup water. Cover and cook slowly for 45 minutes.
This is what it means to braise something--first you lightly fry it, then you let it stew slowly in a closed pan. I learned that! Braise the roof!


4) When done, remove steaks and thicken gravy with flour mixed with 2 tablespoons water. Stir constantly, allowing to boil vigorously for 3 minutes.
About 45 minutes later, the apples and celery had reduced to a chunky applesauce-like mixture. I took out the pork chops and mixed the flour and water into the "gravy."

5) Serve over pork steaks. 4 servings. 
I hesitate to show the finished plate because it looks kind of bland and gross in the picture. Don't let looks deceive you! (Sidenote: I didn't realize in starting this blog I'd need to learn the art of cooking and photography.)


I'm not much of a carnivore, but overall I liked this dish. I made couscous as a side, and the whole thing was ready in under an hour. The pork chops were moist and tender, and the gravy was hot and flavorful, though a tad on the tart side. Next time I'd try it with a slightly sweeter apple, I think. Go easy with the ladle to keep the gravy from overpowering the pork.

And don't forget to add pork steak to your list of apple-friendly foods!