Sunday, January 10, 2016

Pecan Pie

With my pie meter stuck at a lowly two, it was time to move the needle. Fortunately, with several family Christmas gatherings to attend this year, I had plenty of opportunity to make a couple more pies. Out of efficiency, I wanted to find a way to kill two birds with one stone. In other words, I needed a recipe that would make two pies out of one plain pastry. 


Near the end of my Superb Pies and Pastries book, I came across this recipe for Pecan Pie that would help me do just that. Each pie only needs 1/2 of the plain pastry for the bottom crust!

Pecan Pie
(Makes one 8-inch pie)

1/4 cup butter
2/3 cup brown sugar, firmly packed
1/4 teaspoon salt
3/4 cup dark corn sirup
3 eggs, beaten
1 teaspoon vanilla
1/2 recipe Plain Pastry
1 cup pecan halves

1) Cream butter and sugar together until fluffy; add next four ingredients.


I used my KitchenAid mixer to cream the butter and sugar together, constantly scraping the bottom of the bowl to make sure everything at least touched the beater.

Then I added the salt, vanilla, eggs, and corn syrup, and let the mixer do its thing. By this point, the mixture was a sweet, beige, goopy mess. I've never cooked with corn syrup and I was absolutely certain I was using too much, but it looked and smelled like the stuff pecan pie is made of, so I pressed onward. 

 
2) Line piepan with pastry and sprinkle with pecans.


I made the plain pastry just like I did the last time, and halved the dough to make two pie crusts. I have to say, the whole pastry-making process went a little smoother this time because I knew more about what to expect. Experience definitely helps. Still, I turned into a crazy dictator-person at times, and I want to take this moment to publicly apologize to my photography assistant. Taylor, I'm sorry you married an anxious, over-achieving perfectionist. I know now we aren't defusing bombs. We're just making pies. I'll try to remember that next time.

3) Pour the filling over pecans.


What I learned during this step is that it doesn't hurt to give the filling a few more stirs before pouring into the piepan. If you don't, you end up pouring a lot of corn syrup into the pie, and then slopping in the other ingredients that settled to the bottom of the mixing bowl. 

Because I was making two pies, I had an instantaneous opportunity to improve my technique! When I made my second batch of pie filling, I was more careful to blend more thoroughly.

4) Bake in very hot oven (450 degrees F.) 10 minutes; reduce temperature to moderate (350 degrees F.) and bake 35 minutes longer or until knife inserted in center comes out clean. 


 I lovingly put my pies in the oven, taking care to adjust the temperature about ten minutes in, as instructed. And here's what came out of the oven, 45 hand-wringing minutes later:


See how the pie on the right is lighter than the pie on the left? I can't remember now which one had the thoroughly mixed pie filling, and which one had some gloppy layers of corn syrup and other "sediment" poured in, but that's why they look a little different. Strangely enough, they had no difference in texture or taste, and both baked beautifully. You'll also notice that the crust on the left looks a little crispier than the one on the right, and that it shrunk up a little more in the pan. I have a new pastry cloth with a really handy measuring guide to help me better approximate the appropriate crust size next time.


I have a few pecan pie-lovers and experts in my family, so I insisted that they taste it and provide feedback. All gave the pecan pie their glowing praise, but this may be more because I'm the baby of the family and less because it was truly prize-worthy. Still, I tasted the pies and I thought they were good, and I'm discovering my opinion of my cooking matters a lot, too.

I'm sorry there aren't any pictures of the inside. I forgot to take a picture of the pie after we cut it. Next time! So far, though, I'm 4/4 for my pie filling holding together. (I realize you just read in that last sentence a very awkward "four for four for," but I'm just going to let it go.) 

So there you have it--two successful pecan pies to move the pie needle. What kind of pie should I make next?

Sunday, January 3, 2016

Food Art History

In the past five months of writing this blog, I've come a long way. I've made pot roasts and pies, cookies and cakes, dips and sandwiches--all with varying degrees of success. There's no doubt, my skills have sharpened with each new recipe, and I'm feeling much more comfortable in the kitchen.

But more fun than the cooking has been the hunting. I've spent hours picking through dusty shelves at area antique malls, uncovering great old cookbooks to add to my collection.  Most of the books were published by food companies or growers' associations, with recipes featuring their specific products--like Ohio apples, Chiquita bananas, and Sunkist oranges, to name a few.

Of course, in addition to publishing their own cookbooks, the food companies also advertised the old-fashioned way--in magazines. Take a look at some of the gorgeous pages below:


What I love about these recipes is that they call for the inclusion of a specific brand of ingredient. It's not just Green Beans Caesar, whatever that is. It's Del Monte Green Beans Caesar. Remember when I made Joan's Apple Cake? That recipe called specifically for Wesson oil, and sure enough, that's what I used. Marketing at its finest, people!

Many people say that cooking is an art form, and I get that now. Long before Pinterest was a thing, there were companies pushing their products with beautiful spreads in print. I've found there's something really rewarding about re-creating the image from the page. Even when the flavors are questionable, I still have a feeling of accomplishment when I see my complete creation!

In the new year ahead, I'm eager to continue my study of food art history. I'll keep making more vintage recipes, and striving for more victories on the kitchen front. Onward!

Saturday, January 2, 2016

Cottage Cheese Kolacky

If you've been following along at home, then I'm guessing you've got a lot of cottage cheese leftover from when you attempted these recipes. So if you're looking for a way to use it up before it turns, might I suggest this unique recipe for Cottage Cheese Kolacky.


I wasn't familiar with this dessert and there was no photo in the cookbook, so I did a little research. Kolacky is the plural form of Kolach, a kind of sweet wedding pastry that originated in Central Europe and is popular among Czech-American communities. The dough is cut into a circle shape, filled with a dollop of jam or pulped fruit, folded over along the edges, and baked in the oven. Although I'd never made the original, this variation seemed simple enough. You know I'm game for anything that features cottage cheese!


Cottage Cheese Kolacky
1 cup (2 sticks) butter
2 cups cottage cheese
2 cups flour
1/2 tsp salt
Stewed dried fruit and/or preserves

1) Cream together butter and cottage cheese. Sift together flour and salt; mix into butter-cheese mixture thoroughly. 


2) Chill several hours, or overnight. Roll out 1/8 inch thick on a lightly floured board.


The cottage cheese, though manna from above, kept sticking to everything. No matter how much extra flour I added to the dough, it mercilessly clung to the rolling pin and counter, making this recipe painstakingly slow to execute. I'm happy to report that since making these kolacky, I've acquired a pastry frame, cloth, and rolling pin cover to prevent the dough from sticking quite so much. 

3) Cut into 2 or 3 inch squares or circles and place a small amount of fruit or preserves on each.


This was a delicate operation. Too big of a dollop resulted in leaky kolacky, and too little resulted in bland kolacky. As you'll see in later pictures, I don't think I ever got the balance quite right.

4) Fold over and seal edges. Bake 15-20 minutes.


I wasn't quite sure how exactly to fold the dough, so I consulted some images on wikipedia. From one picture, it looks like you're supposed to roll the dough around the edge, leaving the center preserves exposed. And then in another picture, it looks like you're supposed to pinch the edges together into a pocket for the preserves. Despite the dough's excessive stickiness on the rolling pin, I had a hard time keeping the edges together, so this was the best I could do. My kolacky ended up resembling little half moons, like empanadas. We're very multicultural here in my kitchen.

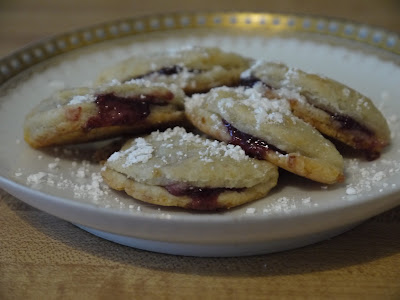
I put the pan in the oven and baked for about 18 minutes until the dough turned crispy and golden brown and the preserves oozed out. The little jam massacre was still tasty, though, with the baked preserves resembling something like fruit leather. A bonus dessert!


5) Sprinkle with confectioners sugar, if desired.


Just so we're clear, there is no 'if' in this statement. Confectioners sugar is always "desired." Okay?

Maybe it's just me, but don't these look a little like emojis? Like the kind that you make to say "I'm kidding!" A la :-P? Anyone?


I'll tell you what, though, these kolacky aren't kidding around when it comes to taste. They were crispy and flaky with the perfect balance of sweetness from the preserves. Like mini pies on the plate. Please note that unlike our last few cottage cheese dishes, this really is the perfect party food--a hit among kids and adults, alike!

You should also note that this recipe yields a LOT of dough, enough to make 4-5 dozen kolacky if you're dedicated. I was too frustrated with the stickiness of the dough to persevere beyond about two dozen, but now that I have more special pastry tools at my disposal, I think I could go the distance next time. Game on, future pastries!